What this screen does
The Timetable Builder places one class session at a time: this course, with this lecturer, in this room, on this day, at this time. You repeat it for every class in the programme. It is a data-entry screen, not an automatic scheduler — nothing is generated for you.
You never create a timetable version by hand
This is the single most confusing thing about the screen, so learn it before you start. A version is the whole timetable for one programme, on one campus, in one term. The builder looks after versions for you:
- The first time you add a class for a given year + term + campus + programme, the system creates a draft version and names it automatically — for example
TT-1-1-P5-C2-V4. - Every later class you add for that same combination joins the same draft. There is no "new timetable" button and you do not need one.
- If that timetable has already been published, adding a class does not touch the live one. The system opens a new draft version (V4 becomes V5) and asks you for a revision reason first.
So the green Draft timetable badge in the corner of the form is telling you the truth: whatever you add here lands in a draft, and no student sees it until somebody publishes.
Four fields decide which timetable you are editing: Academic Year, Academic Term, Campus and Programme. Change any one of them and you are working on a completely different timetable. This is also why a wrong Term empties three dropdowns at once.
Who is allowed in
Holding a timetable permission is not enough on its own — your role and your permission must both line up. This is the rule that catches people out across the whole module.
| You are | Can you open the Builder? | What you may do |
|---|---|---|
| Head of Department | Yes | Build and edit sessions in your own department’s draft, and cancel slots. You cannot approve or publish. |
| Registrar | Yes | Everything, on every campus — build, approve and publish. |
| Super Admin | Yes | Everything. Not a training account — it bypasses the checks this guide describes. |
| Dean | No | Reviews a submitted timetable and may Reject it back. A Dean does not author sessions and cannot approve. |
| Lecturer | No | Reads the published result in the Lecturer Portal. |
If you open the builder and get this instead, your account is missing the role or the permission — not the menu:
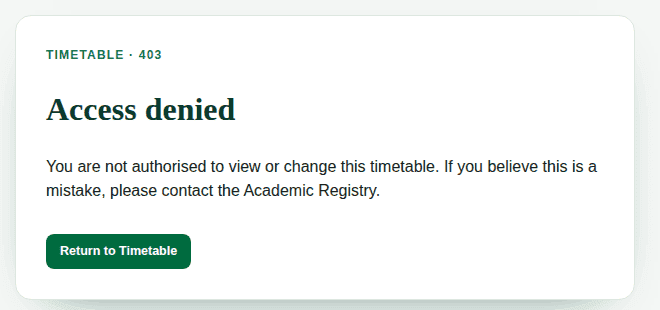
Timetable Setup — where rooms, teaching days and periods are created — is a separate screen with a stricter gate. A Head of Department is refused there even though the Builder opens normally. Setup belongs to the Registry.
What must exist before you start
The builder only offers you things that already exist elsewhere in the system. If a dropdown is empty, nothing is broken — something upstream has not been set up. Five things must be in place.
- An active room on that campus — created in Timetable Setup by the Registry.
- A teaching day for that campus and that term, flagged as a teaching day.
- A teaching period for that campus and term (optional, but strongly recommended — see step 8).
- The course mapped to the programme at that year of study and that semester, in the curriculum. A course that is not on the programme’s curriculum cannot be timetabled for it.
- The lecturer assigned to that course for that term, under Lecturer Assignment. The lecturer must also actually hold the Lecturer role.
Reading an empty dropdown
| Empty box | What it means | Who fixes it |
|---|---|---|
| Course | The course is not mapped to this programme for this year of study and semester | Curriculum — Academic Registry |
| Day | No teaching day configured for this campus and term | Timetable Setup — Registry |
| Teaching Period | No period grid for this campus and term; the box reads No configured period and you must type the times by hand | Timetable Setup — Registry |
| Room | No active room on this campus | Timetable Setup — Registry |
| Lecturer | Nobody holds the Lecturer role, or nobody is assigned to this course | Lecturer Assignment — HOD |
An empty dropdown gives you no explanation on screen. Before you conclude something is missing, check your Term first — the Term list is sorted newest-first, so it is easy to land on a future semester that has no setup behind it at all.
Open the builder
Sign in with your own staff account at the administration portal. Where you land depends on your role — a Head of Department lands on the Exams Dashboard, a Registrar lands in Registry. That is normal.
- Sign in at
/admin/login. - In the module bar across the top, click Academics. The left sidebar redraws to the Academics workspace.

The module bar. The sidebar only ever shows the module you are in — a missing Timetable menu almost always means the wrong module, not a missing permission. - In the sidebar, under the TIMETABLE group, click Timetable Builder.
Menu path Academics › Timetable › Timetable Builder — or go straight to /admin/timetable/builder
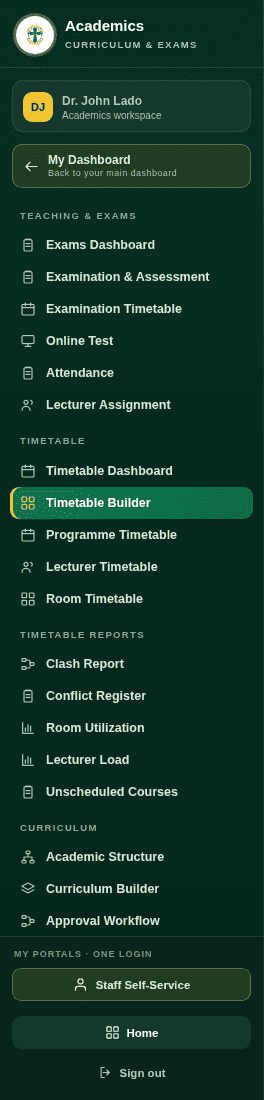
The five timetable screens
- Timetable Dashboard — the versions and their status. Where a draft is submitted, approved and published.
- Timetable Builder — this guide. Where classes are placed.
- Programme Timetable — the finished grid for one programme, printable.
- Lecturer Timetable — the same sessions seen per lecturer.
- Room Timetable — the same sessions seen per room.
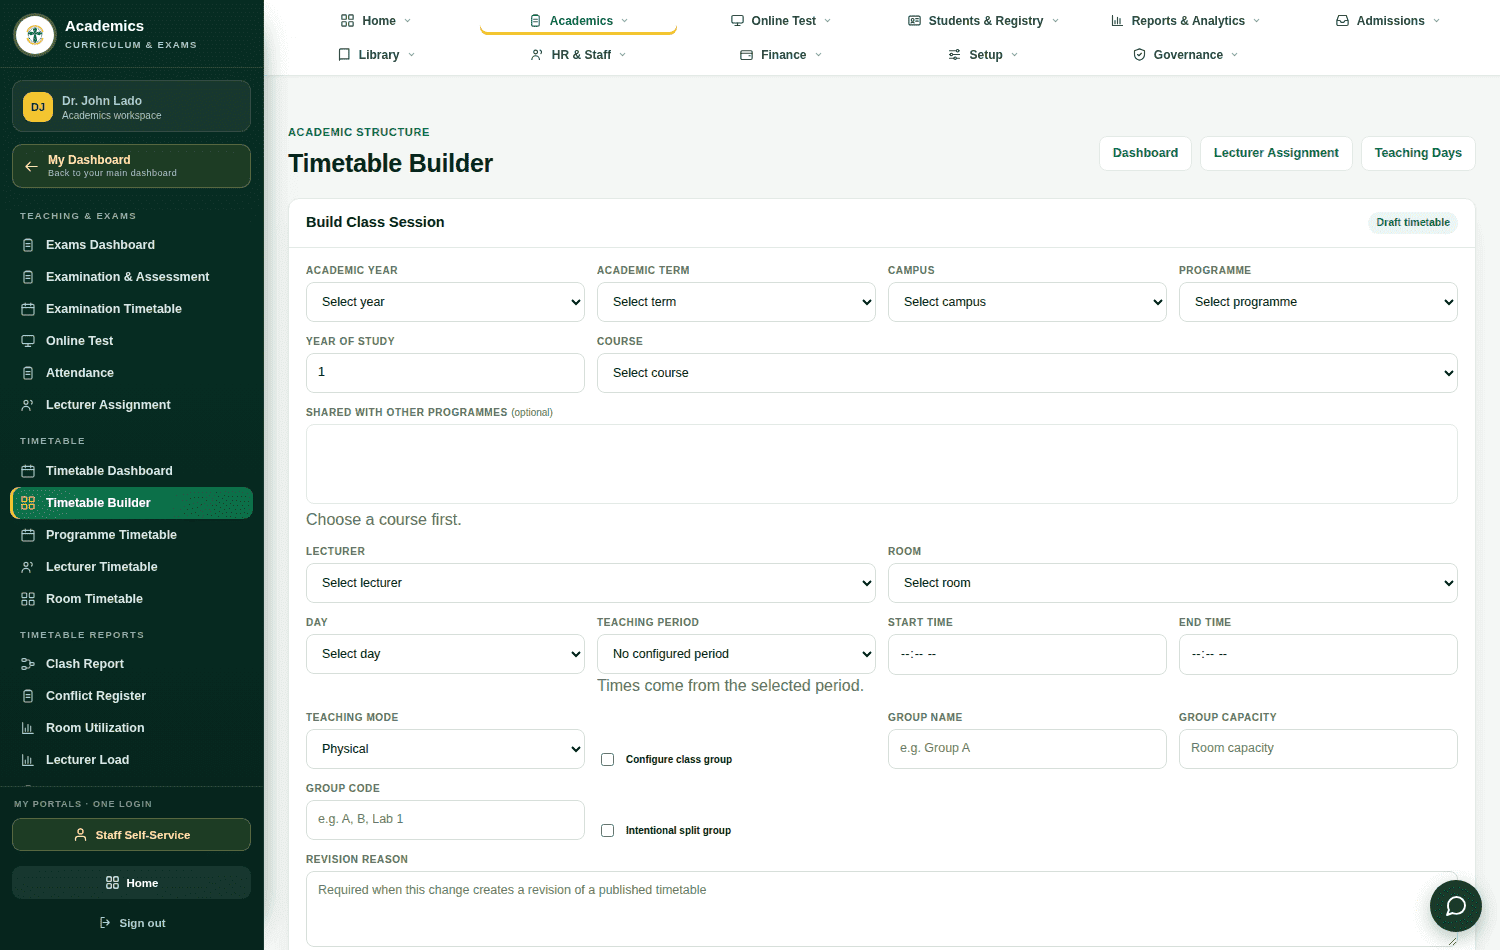
Set the context — the top row, in this order
Always fill the top row left to right. Each choice filters the boxes below it, so working out of order gives you empty lists and a wasted five minutes.
- Academic Year — pick the year, e.g.
2026/2027. This filters the Term list. - Academic Term — pick the semester, e.g.
Sem 1-Sept 2026. Check this one twice. It filters days, periods and courses at the same time. - Campus — e.g.
Juba Campus. This filters the rooms and the days. - Programme — e.g.
DIT — Diploma in Information Technology. Together with Year of Study, this filters the Course list. - Year of Study — type the number,
1to8. It is a plain number box, not a dropdown. It defaults to1.

If three dropdowns look empty at once — no courses, no days, no periods — you have almost certainly chosen the wrong Term. Fix the Term before you change anything else.
Choose the course — and say who shares the class
The Course list shows only courses on this programme’s curriculum at the year and semester you chose. Each entry is labelled with them, for example BIT-123 — Introduction to ICT / Y1 S1.
- Pick the Course.
- Read the Shared with other programmes box that appears underneath. It lists every other programme that teaches this same course this semester.
- If students from those programmes sit in this same room at this same hour, select them — hold Ctrl (or Cmd) to pick more than one. If they are taught separately, select nothing.

Sharing correctly is what stops a joint lecture being booked twice and colliding with itself. Leave it empty and each programme needs its own session, its own room and its own hour.
Lecturer and room
Two dropdowns, both fed from elsewhere in the system.

0011 — Lecture Hall (50) seats fifty.- Lecturer — the person teaching. They must already be assigned to this course for this term under Lecturer Assignment, and must hold the Lecturer role. If they are not, the builder accepts the form and then refuses to save it.
- Room — only active rooms on the campus you chose are listed. Check the capacity against your class size; the system does not check it for you.
Day and time
Choose the day, then the period. The times fill themselves in.
- Day — each entry is labelled
campus / term / weekday, e.g.JBA-SS-01 / Sem 1-Sept 2026 / Monday. Only configured teaching days for your campus and term appear. - Teaching Period — pick the slot, e.g.
SEP1 — Morning (08:00 – 10:00). - Look at Start Time and End Time. They now read the period’s hours and have locked themselves, with the hint Times come from the selected period. That is correct — do not try to edit them.

When a campus and term has no periods configured, the Teaching Period box reads No configured period and the two time boxes stay open. Then — and only then — you type the times yourself in 24-hour form, and the end must be after the start.
Teaching mode, and splitting a big class

- Teaching Mode required — Physical, Online, Blended, Practical, Lab, Tutorial, Intensive or Examination. Defaults to Physical.
- Configure class group — tick this when the cohort is split into named groups. Then fill Group Name (e.g.
Group A) and, if you wish, Group Capacity. - Group Code — a short tag such as
A,BorLab 1. It is what shows on the timetable list. - Intentional split group — tick this when you deliberately teach the same course to two groups at the same hour. It tells the clash checker that the second session is on purpose. A group code is compulsory when you tick it.
One class, one session, no ticks. A cohort too big for the room — tick both, name the groups, and add one session per group.
Revision reason, then Add to Timetable
Revision Reason — usually leave it blank
The last box on the form is Revision Reason. It matters in exactly one situation: when the timetable for this year, term, campus and programme has already been published. Then the system must open a new version to hold your change, and it will not do that silently — leave the box empty and you get “Enter a revision reason before changing a published timetable.”
Write what actually changed, e.g. AGR 101 moved from Wednesday to Thursday at the Dean’s request.
Now press the button
- Scroll to the bottom of the form and click Add to Timetable.
- The page reloads and a green confirmation appears: Timetable session added to draft version TT-1-1-P5-C2-V4. That code is your draft.
- The new class appears as a row in the Timetable Sessions table below, with status draft.
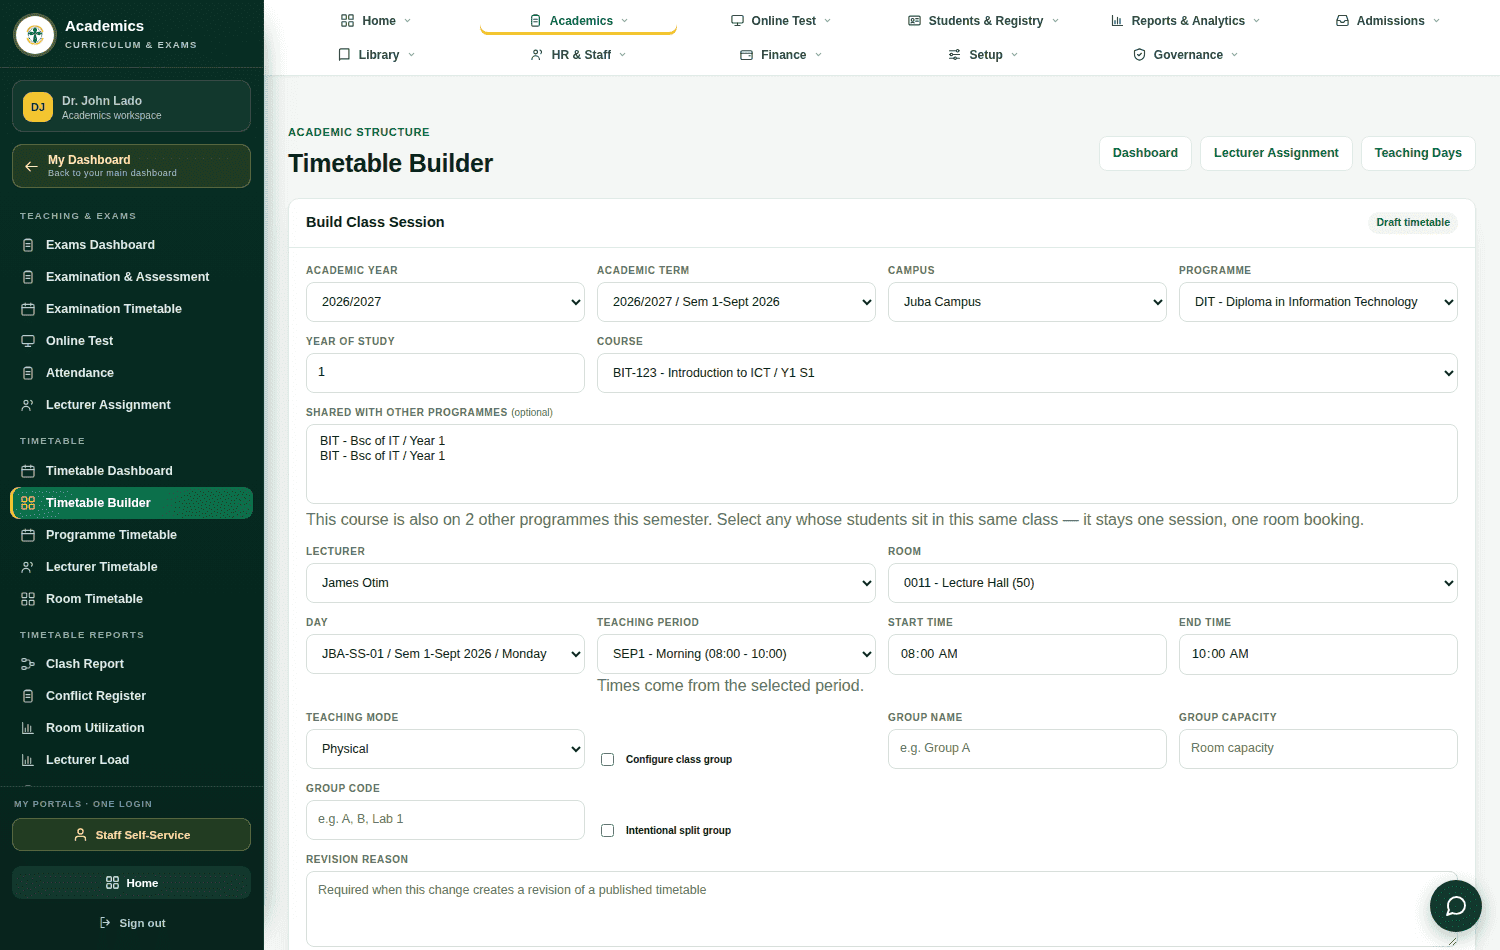
The worked example in these pictures
- Year / Term
- 2026/2027 — Sem 1-Sept 2026
- Campus
- Juba Campus
- Programme
- DIT — Diploma in Information Technology
- Year of study
- 1
- Course
- BIT-123 — Introduction to ICT
- Lecturer
- James Otim
- Room
- 0011 — Lecture Hall (50 seats)
- Day / Period
- Monday — SEP1 Morning, 08:00–10:00
- Mode
- Physical
Then do it again
The context row keeps your choices. For the next class of the same programme you normally change only Course, Lecturer, Room, Day and Period — four or five boxes, not fourteen. Work through the programme’s courses one at a time until every class has a slot.
Check the list at the bottom
Everything you have built shows in the Timetable Sessions table under the form. Read it after every few entries — it is the only place you see your work as a whole.
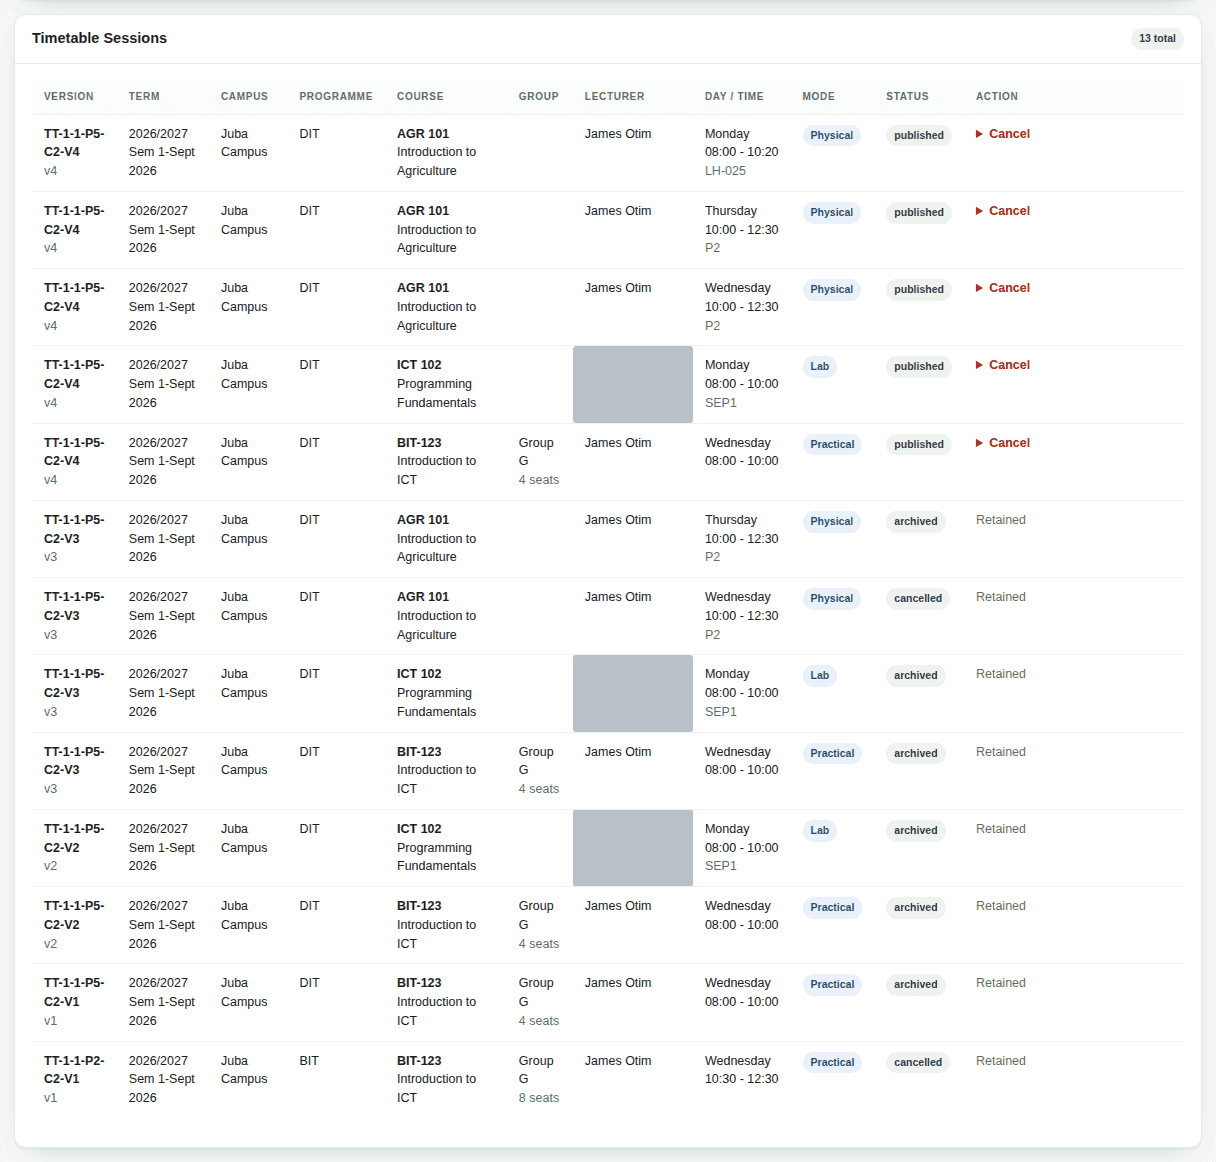
What each status means
| Status | Meaning | Can you still change it? |
|---|---|---|
| draft | Yours, not submitted, nobody else can see it | Yes — add more, or Cancel a slot |
| under review | Submitted; waiting on the Dean or Registrar | No — it is out of your hands |
| published | Live: students and lecturers can see it | Only by starting a new version, with a reason |
| archived | An older version, replaced by a newer published one | No — kept for the record |
| cancelled | Withdrawn deliberately | No — the row stays as history |
The only action on this table is Cancel, and it asks for a reason. There is no delete. A cancelled slot stays visible for the audit trail, marked Retained. That is deliberate — a timetable people have already planned around should never quietly vanish.
If the builder refuses
Refusals are specific and they are almost always about data that does not exist yet, not about the form you just typed. Read the sentence — it names the fix.
| What the screen says | What actually happened | What to do |
|---|---|---|
| Room clash: the selected room is already booked for that day and time. | That room is taken in that slot | Another room, or another hour |
| Lecturer clash: the selected lecturer already has a timetable slot at that time. | You have double-booked a person | Another lecturer, or another hour |
| Programme clash: this programme cohort already has a timetable slot at that time. | The students are already in another class then | Another hour — or a class group, if the split is intentional |
| Missing lecturer assignment: assign this lecturer to the selected course and academic term. | No assignment for that lecturer, course and term | Fix it in Lecturer Assignment, then come back |
| This course is not actively mapped to the selected programme, year of study, and academic term. | The curriculum does not carry that course there | Registry maps it — or your Year of Study / Term is wrong |
| Inactive room: the selected room is not active on the selected campus. | The room is disabled, or belongs to another campus | Registry activates it, or choose another |
| The selected day is not configured as a teaching day for that campus and term. | That weekday is not a teaching day here | Registry adds it in Timetable Setup |
| Only active courses can be placed on the timetable. | The course record is inactive | Registry reactivates it |
| Invalid time range: the end time must be after the start time. | Hand-typed times are the wrong way round | Retype them, 24-hour |
| Enter a revision reason before changing a published timetable. | This timetable is live; your change needs a new version | Fill in Revision Reason and add again |
| Enter a class group name when enabling grouped timetable scheduling. | You ticked the group box and left the name empty | Name the group, or untick |
| You do not have permission to perform this timetable action. | Wrong role, wrong campus, or wrong department | Ask the Registry — role and permission must both match |
The three clash messages are the system doing its job. Nothing is saved, nothing is broken — change the room, the lecturer or the hour and add it again.
Where the builder ends — and who takes over
Your job on this screen is finished when every class in the programme has a row in the sessions table and the version is still draft. The builder cannot approve or publish anything, and it is not supposed to.
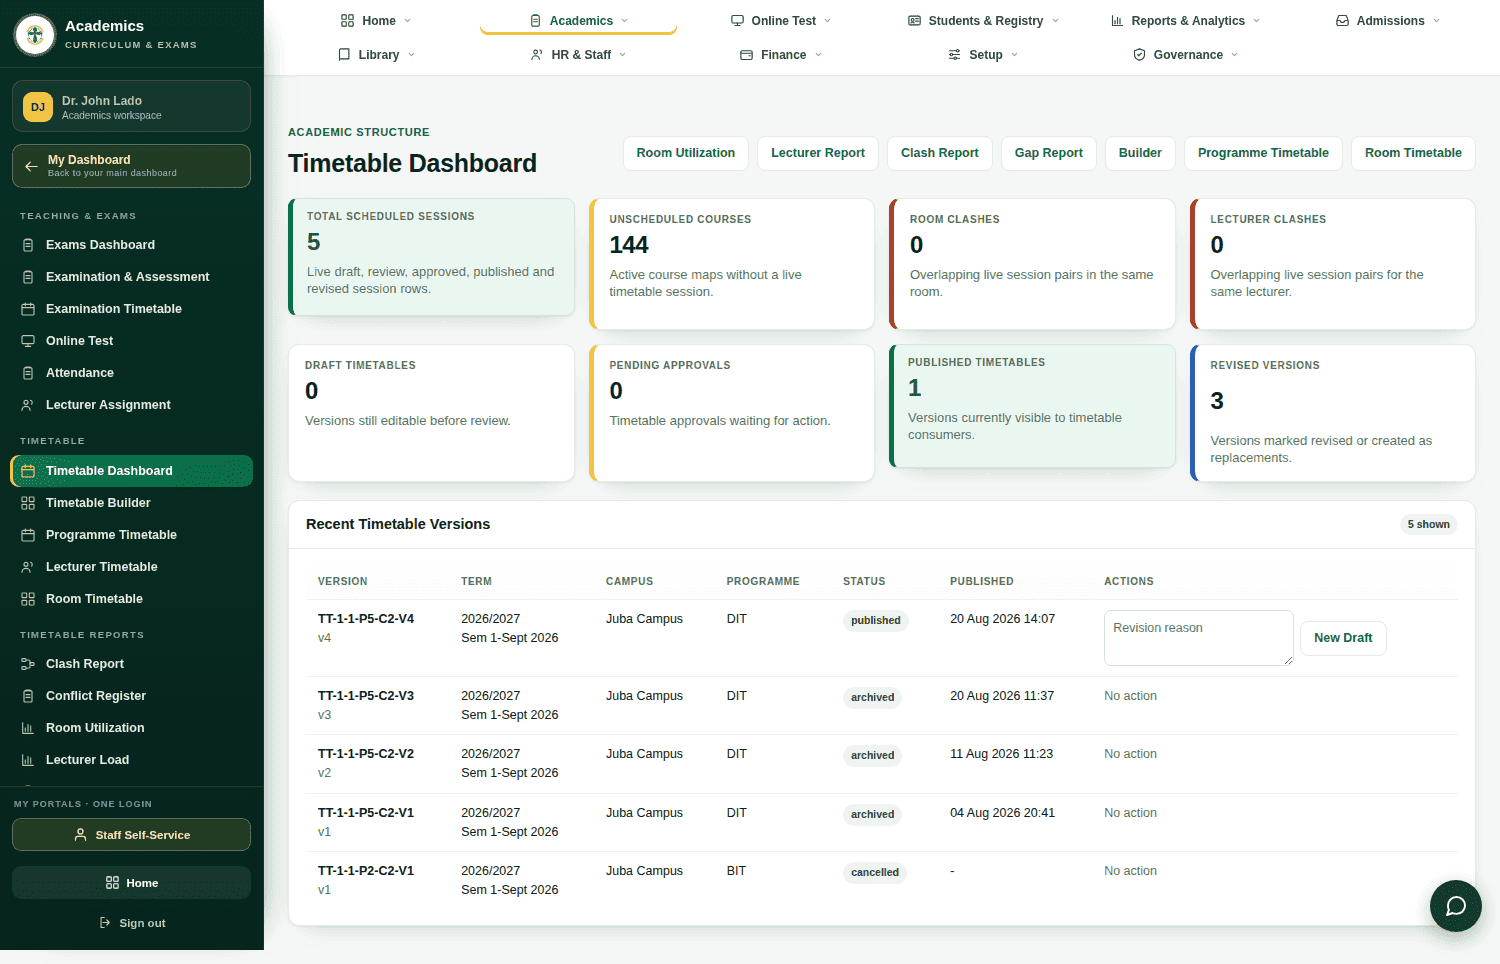
- Go to Academics › Timetable › Timetable Dashboard.
- Check the top row: Room clashes and Lecturer clashes should both read 0. If they do not, go back and fix them before submitting.
- Look at Unscheduled courses — that is your remaining work across the institution.
- Find your version in Recent Timetable Versions and press Submit Review. There is no form to fill in; submitting captures no text.
- Tell your Dean it is waiting. From here it is out of your hands.
What happens after you submit
| Stage | Who does it | What they must write |
|---|---|---|
| Submit for review | You — Head of Department | Nothing |
| Reject and return | Dean | A reason — compulsory |
| Approve | Registrar | Nothing |
| Publish | Registrar | A comment, optional |
| Start a revision | Head of Department or Registrar | A reason — compulsory |
You only ever justify the negative. Rejecting a timetable demands a written reason; approving one records nothing at all. And publishing a version automatically archives the previous live timetable for that programme — there is one live timetable per programme per term, and no confirmation prompt.
Where it becomes real
Once published, the same sessions appear — unchanged — in four more places: the Programme Timetable grid, the Lecturer Portal, the student’s My Timetable page and their printable timetable, and as the slots that Attendance registers against. Nothing shows anywhere until publication.
Field reference
Every box on the Build Class Session form, in the order it appears.
| Field | What to put in it | Where the choices come from | |
|---|---|---|---|
| Academic Year | req | The academic year, e.g. 2026/2027 | Academic calendar |
| Academic Term | req | The semester within that year | Academic calendar; must belong to the year |
| Campus | req | Where the class physically sits | Foundation setup |
| Programme | req | The programme that owns the class | Foundation setup |
| Year of Study | req | A number, 1–8. Typed, not chosen | — |
| Course | req | The course being taught | Curriculum map for that programme, year and semester |
| Shared with other programmes | opt | Other cohorts sitting in this same class | Other programmes carrying the same course this semester |
| Lecturer | req | Who teaches it | Users holding the Lecturer role; must be assigned to the course |
| Room | req | Where it meets, with capacity shown | Active rooms on the chosen campus |
| Day | req | The weekday | Teaching days for that campus and term |
| Teaching Period | opt | The timetable slot; fills the times for you | Periods for that campus and term |
| Start / End Time | opt | Only typed when there is no period grid; end after start | — |
| Teaching Mode | req | Physical, Online, Blended, Practical, Lab, Tutorial, Intensive, Examination | Fixed list |
| Configure class group | opt | Tick to name a group; then Group Name is required | — |
| Group Name / Capacity | opt | e.g. Group A; capacity 1–10000 | — |
| Group Code | opt | Short tag: A, B, Lab 1. Required if splitting | — |
| Intentional split group | opt | Tick when the same course is deliberately taught twice at once | — |
| Revision Reason | opt | Required only when the timetable is already published | — |